
Key Takeaways
- Basement ceiling soundproofing reduces noise from upper floors and enhances privacy, making basements more livable and valuable.
- There are several types of soundproofing methods, including adding mass, sealing gaps, and decoupling ceiling surfaces.
- Rockwool, fibreglass, and Green Glue are among the most effective materials for blocking airborne noise and vibrations.
- Choose your soundproofing approach based on your ceiling type (unfinished, drop ceiling, or finished) and noise level.
- DIY methods work for basic needs, but complex installations — like resilient channels or floating floors — should be handled by professionals.
- Soundproofing costs vary depending on materials, ceiling condition, and installation complexity — get a professional quote for accurate pricing.
- For long-term performance, combine multiple strategies: insulation, sealing, drywall layering, and vibration control.
Soundproofing a basement ceiling is a crucial step for many Toronto homeowners seeking to maximize the use of their lower-level space. Whether your basement is used as a rental unit, home office, gym, or personal theatre, unwanted noise from upper floors can quickly reduce its comfort and functionality.
In homes, where basements are often converted into living or working spaces, proper soundproofing not only enhances privacy but can also increase the overall property value. While some soundproofing methods can be handled as a DIY project, achieving professional-level results requires specific materials, knowledge, and experience. To avoid common mistakes and ensure the best outcome, it’s often wise to trust certified basement renovation specialists.
But before deciding whether to tackle this project yourself or hire experts, let’s explore why basement ceiling soundproofing matters and how it can transform your space.
Why Would You Soundproof a Ceiling?
Basement ceiling sound insulation offers several practical benefits for homeowners, especially during basement renovation. Whether you’re turning your space into a basement apartment or simply want to create a quieter environment for personal use, soundproofing can make a big difference.
Here are some common reasons why homeowners choose to soundproof their basement ceiling:

For a Home Theatre:
Enjoy every detail of your favourite movies, shows, or music without unwanted interruptions from upstairs noise.
For a Home Gym:
Reduce the sound of equipment, footsteps, and workout routines so you can focus and exercise in peace—or prevent noise from disturbing others.
For a Playroom or Gaming Area:
Minimize noise from kids playing or gaming sessions to create a better environment both above and below the basement ceiling.
To Block Noise from Laundry Rooms or Garages:
Many basements are located near laundry rooms, utility areas, or garages. Soundproofing helps reduce noise from washing machines, dryers, and other equipment, making your basement apartment or personal space more relaxing.
Even if you don’t have a specific purpose for your basement yet, installing proper sound insulation can make the space more versatile and ready for future needs.
For a Basement Rental, Airbnb, or Guest Suite:
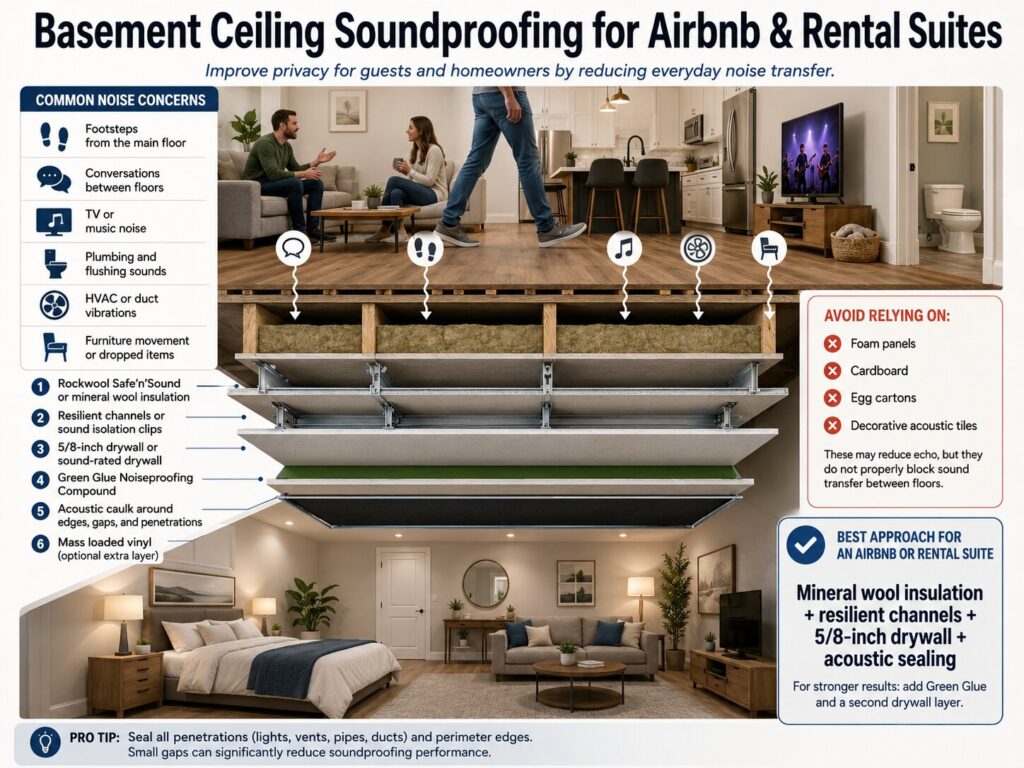
If you rent out your basement or use it as an Airbnb, soundproofing the ceiling helps improve privacy for both guests and homeowners.
The most common noise concerns are:
- Footsteps from the main floor
- Conversations between floors
- TV or music noise
- Plumbing and flushing sounds
- HVAC or duct vibrations
- Furniture movement or dropped items
Avoid relying on foam panels, cardboard, egg cartons, or decorative acoustic tiles. These products mainly reduce echo inside the room, but they do not properly block sound transfer between floors.
For better results, use a full ceiling soundproofing system with materials such as:
- Rockwool Safe’n’Sound or mineral wool insulation between ceiling joists
- 5/8-inch drywall or sound-rated drywall for added mass
- Green Glue Noiseproofing Compound between drywall layers
- Acoustic caulk around ceiling edges, gaps, and penetrations
- Resilient channels or sound isolation clips to reduce vibration transfer
- Mass loaded vinyl, if extra sound blocking is needed
For an Airbnb or rental suite, the best approach is usually mineral wool insulation + resilient channels + 5/8-inch drywall + acoustic sealing. For stronger results, add Green Glue and a second drywall layer.
Common Basement Ceiling Noise Problems
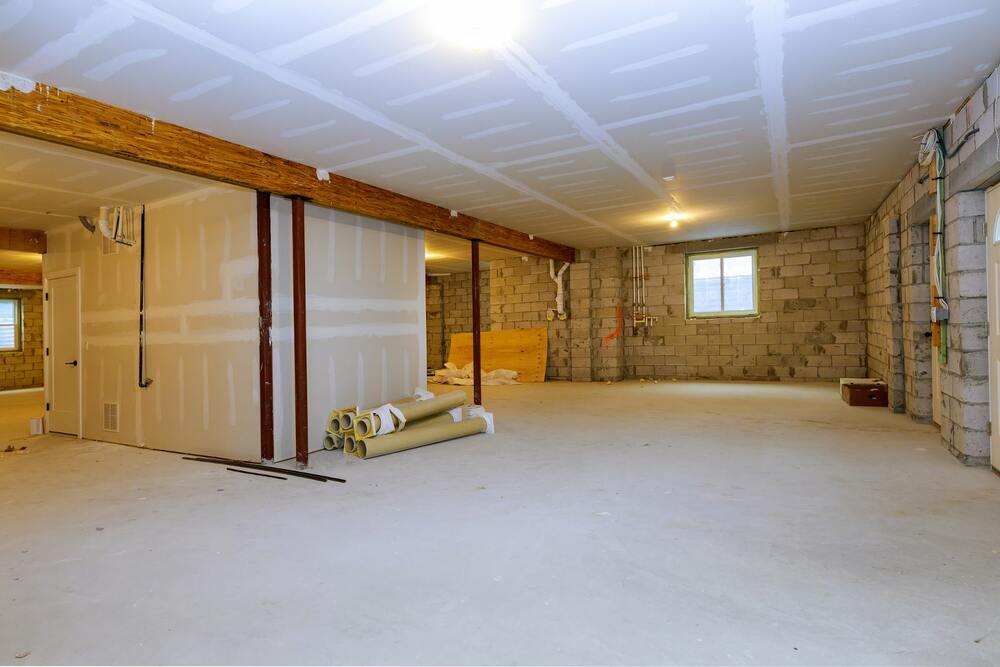
Before starting any basement renovation or planning to create a cozy basement apartment, it’s essential to understand the types of noise that typically travel through the basement ceiling. Proper identification of noise sources will help you choose the most effective soundproofing methods.
The Most Frequent Noise Sources:
-
Footsteps from Upstairs
Walking, running, or furniture-moving noises can easily transfer through the ceiling structure. -
Water and Plumbing Sounds
Water flow through pipes, toilet flushes, or draining sounds from the upper floors are common disturbances. -
Vibrations from Appliances / Laundry Rooms
Washing machines, dryers, and other household appliances create both airborne noise and vibrations that can penetrate basement ceilings.
| Noise Source | Example | Recommended Solution |
|---|---|---|
| Footsteps from Upstairs | People walking | Floor padding above / Soundproofing the ceiling |
| Plumbing | Running water sounds | Insulated pipe boxes |
| Laundry Room / Appliances | Washing machine noise | Vibration absorbers + Green Glue noiseproofing |
“The biggest mistake homeowners make with soundproofing is thinking insulation alone will solve everything. True soundproofing means addressing every sound path — including vibrations, structural gaps, and airborne noise. That’s where a strategic plan makes all the difference.”
What Doesn’t Work for Basement Ceiling Soundproofing?
Not every “soundproof” product is designed to block noise between floors. Foam panels, cardboard, egg cartons, thin fabric pads, peel-and-stick panels, and decorative acoustic tiles usually only reduce echo inside the basement.
Used on their own, basic acoustic panels from brands like DEKIRU, JBER, Audimute, or generic Amazon panels are usually better for improving room acoustics than for blocking upstairs noise such as footsteps, voices, plumbing sounds, or TV noise.
For basement ceiling soundproofing, homeowners should focus on complete ceiling systems that add mass, seal gaps, and reduce vibration transfer instead of relying on lightweight surface panels alone.
Best Insulation Materials for Soundproofing
Soundproofing your basement ceiling using materials like fibreglass, Green Glue, or rockwool is an effective way to reduce noise, but the key is in the details. Here’s what you need to know:
Rockwool tends to be more expensive than fibreglass, but it offers superior sound absorption due to its density. Green Glue is a specialized compound applied between two layers of drywall; it dries into a flexible barrier that effectively dampens sound vibrations. Fibreglass insulation is installed similarly to traditional insulation and is widely available at most home improvement stores. Rockwool is made by melting rocks and spinning them into dense fibres, making it excellent for soundproofing as well as HVAC applications.
Since basement ceilings are often constructed with wood, which does not naturally block sound well, the best insulation options are dense materials like fibreglass or rockwool that absorb sound efficiently. Choosing the right material ultimately depends on your personal preference and budget.

| Material | Soundproofing Effectiveness | Ease of Installation |
|---|---|---|
| Rockwool | ★★★★☆ | ★★☆☆☆ (Requires experience) |
| Fiberglass | ★★★☆☆ | ★★★★☆ (Easy to install) |
| Green Glue | ★★★★★ | ★★★☆☆ (Needs double drywall layers) |
Effective Methods for Basement Ceiling Soundproofing

There are several effective methods to soundproof a basement ceiling, with one of the most important being to add mass. This can be done by installing dense fibreglass or rockwool insulation between ceiling joists, which helps absorb sound. Another way to increase mass is by applying two layers of drywall to the ceiling. The added thickness significantly reduces sound transmission, especially when combined with sound-damping compounds like Green Glue.
Sealing any gaps or cracks in the ceiling and walls with acoustic caulk is essential to prevent sound leaks. Similarly, installing weatherstripping around basement doors and windows can block noise from entering or escaping through these weak points.
To further enhance soundproofing, resilient channels can be installed between the ceiling joists and drywall. These metal channels decouple the drywall from the structure, reducing vibrations and noise transmission.
For serious noise problems, consider installing a floating floor above the basement ceiling. This type of floor system is not rigidly attached to the subfloor, which helps isolate sound and minimize vibrations travelling between floors.
Finally, installing soundproofing panels made of dense materials, such as rockwool or fibreglass, can add an extra layer of noise absorption.
When Should You Call a Professional?
While some soundproofing steps, like caulking or adding insulation, can be tackled as DIY projects, more complex tasks, such as installing resilient channels, double drywall layers with Green Glue, or floating floors, are best left to experienced professionals. Hiring an expert ensures the job is done correctly and efficiently, preventing costly mistakes and maximizing your basement’s soundproofing performance.
Cost Considerations for Basement Ceiling Soundproofing
Basement ceiling soundproofing costs in Toronto and the GTA depend on how the ceiling is built, how much noise you want to reduce, and whether the space is already finished. An open ceiling is usually easier to upgrade because joists, pipes, ducts, and wiring are accessible. A finished ceiling often costs more because it may require extra preparation, added drywall layers, or partial removal of existing materials.
The table below provides general planning ranges for common basement ceiling soundproofing upgrades. Final pricing can vary based on material selection, labour, ceiling height, pot lights, bulkheads, HVAC runs, plumbing lines, and the level of finishing required.
| Soundproofing Upgrade | Best Used For | Estimated Toronto/GTA Cost |
| Acoustic gap sealing | Sealing small openings around pipes, vents, ceiling edges, and penetrations | $150 – $600+ per project area |
| Fibreglass insulation | Budget-friendly sound absorption in open ceiling cavities | $1.50 – $3.50 per sq. ft. |
| Mineral wool insulation | Better sound absorption between ceiling joists | $2 – $5 per sq. ft. |
| 5/8-inch drywall ceiling | Adding mass to reduce sound transfer | $3 – $6 per sq. ft. |
| Resilient channel system | Reducing vibration transfer between floors | $5 – $10 per sq. ft. |
| Sound isolation clips and hat channel | Stronger decoupling for higher noise reduction | $8 – $15 per sq. ft. |
| Double drywall with damping compound | Reducing airborne noise and vibration through added mass and damping | $7 – $13 per sq. ft. |
| Mass loaded vinyl layer | Extra sound-blocking layer in a larger ceiling system | $4 – $8 per sq. ft. |
| Drop ceiling sound upgrade | Improving an existing suspended ceiling with insulation, heavier tiles, and sealing | $6 – $12 per sq. ft. |
| Full soundproof ceiling system | Rental suites, Airbnb units, home theatres, or high-noise areas | $12 – $25+ per sq. ft. |
For a 600 sq. ft. basement ceiling, a basic improvement may cost approximately $1,200 – $3,000, while a more complete ceiling soundproofing system may range from $7,200 – $15,000+. Projects that involve demolition, multiple drywall layers, Green Glue, sound isolation clips, bulkheads, ductwork, or premium finishing can cost more.
Is $1,000 Enough to Soundproof a Basement Ceiling?
For most Toronto and GTA basement ceilings, $1,000 is usually not enough for full soundproofing, especially if the ceiling is around 600 sq. ft. or already finished. A $1,000 budget may help with small improvements, but it will not usually cover a complete ceiling system with insulation, drywall, resilient channels, Green Glue, acoustic sealing, and labour.
With a limited budget, homeowners may be able to focus on targeted upgrades, such as:
- Sealing gaps around pipes, vents, ceiling edges, and penetrations
- Adding rugs or underlayment to the floor above
- Improving door seals around the basement
- Adding insulation in a small open-ceiling area
- Reducing echo inside the basement with acoustic panels
These upgrades can make the space more comfortable, but they should be viewed as noise reduction, not full soundproofing. For stronger privacy between floors, especially in a basement rental, Airbnb suite, bedroom, or home theatre, a larger budget is usually needed because the best results come from combining mass, insulation, sealing, and vibration control.
How to Soundproof an Unfinished Basement Ceiling
Making your basement completely soundproof may not be possible, but you can significantly reduce noise with the right approach. The key principle in soundproofing is adding mass, since sound is energy, the more mass you add, the more sound waves are absorbed. For unfinished basement ceilings, this often means adding layers and sealing gaps to block sound transmission.
Unfinished ceilings are open, exposing joists, pipes, and wiring, which makes soundproofing different from finished ceilings that have drywall or panelling installed. Here’s a simple step-by-step approach for unfinished ceilings:
- Seal cracks and gaps: Identify any openings where sound can pass through and seal them using soundproofing sealant or acoustic caulk. This is crucial to prevent noise leakage.
- Add mass with materials: Hang heavy materials, such as old blankets or thick towels, close to the ceiling to temporarily dampen sound. For a more permanent solution, install mineral wool insulation (such as Rockwool) between the joists. Mineral wool is dense and excellent at absorbing sound.
- Install drywall or panels: Adding one or two layers of drywall can drastically improve soundproofing. Use Green Glue between the drywall layers to create a flexible, sound-dampening barrier that reduces vibrations.
- Seal joints: After drywall installation, ensure that all seams and edges are sealed to prevent sound leaks.
By combining these steps — sealing, insulating, adding mass, and sealing joints — you can effectively soundproof an unfinished basement ceiling and create a quieter, more comfortable space.

How to Soundproof a Basement Drop Ceiling

Can you soundproof an existing ceiling? The answer is yes! Sound can travel through even the smallest openings, making your ceiling a common source of noise in your home. If you have a drop ceiling in your basement, several practical steps can be taken to reduce noise.
One simple and effective method is upgrading the door seals around the basement. Door sealing kits, which usually include weatherstripping and door sweeps, are widely available at hardware stores. Installing these seals is an easy way to block noise without major renovations.
Soundproofing a drop ceiling offers several advantages:
- Easy to remove and reinstall: Drop ceilings can be easily taken down and put back up, making maintenance and future upgrades more straightforward.
- Convenient for running cables and pipes: The open space above the panels provides easy access for electrical wiring and plumbing, eliminating the need to cut into drywall.
However, there are some drawbacks to consider:
- Less effective sound blocking: Drop ceilings typically offer less mass and density compared to solid drywall ceilings, resulting in less efficient sound blocking.
- Potential gaps: Sound can still leak through the gaps between tiles or around the edges if not correctly sealed.
Overall, while drop ceilings offer convenience and flexibility, they may require additional soundproofing materials, such as acoustic tiles or insulation, to achieve better noise control.
How to Soundproof Finished Basement Ceiling
If your basement is finished, you may be wondering if there is anything you can do to soundproof the space. The good news is that there are a few things you can do to reduce noise in a finished basement. The best way to soundproof basement ceiling is not always necessarily to add mass, but to decouple the ceiling from the floor above. This means that you will need to create a gap between the two surfaces.
One way to do this is to install resilient channels. Resilient channels are metal strips that are attached to the joists. They provide a space for the drywall to be installed and help to reduce noise transmission. Another way to soundproof basement ceiling is to add mass loaded vinyl. Mass loaded vinyl is a heavy material that is used to block sound. It can be applied directly to the ceiling or hung from the joists using wire. Mass loaded vinyl is an effective way to reduce noise, but it can be expensive.
If you want to save money, you can use fiberglass insulation. Fiberglass insulation is a great way to soundproof basement ceiling because it is effective and inexpensive. The only downside is that it can be difficult to install. If you are not comfortable doing the work yourself, you can hire a professional to do it for you.

Tips to Make Your Soundproofing Basement Ceiling Process Better

Basement ceiling soundproofing isn’t a one-size-fits-all solution — the right approach depends on the level of noise you need to reduce. Generally, adding more mass to the ceiling improves sound reduction. For light noise, simple methods like using blankets or towels can help. For heavier noise, you’ll need to add dense materials to the ceiling.
To achieve the best results, consider hiring a professional basement renovation company, such as Reno Duck. Experts can assess your space and recommend the ideal soundproofing solution.
Here are the top 5 tips to make your soundproofing project easier and more effective:
- Use high-density materials, such as Rockwool, for improved sound absorption.
- Avoid gaps and cracks that allow sound to leak through.
- Don’t forget to insulate around pipes and plumbing.
- Account for ventilation noise from air ducts and vents.
- For complex jobs, it’s best to hire professionals.
Preparing your workspace by clearing the area and covering vents will also help contain noise and protect your belongings during the installation process.
Final Thoughts on Sounproofing Basement Ceiling
Can you soundproof a basement ceiling? The answer is definitely yes! However, to achieve the best results, it’s essential to approach the project correctly. Follow these proven tips, and you’ll enjoy a much quieter basement in no time.
Remember, the key to effective soundproofing is to add mass, decouple surfaces, and carefully seal all cracks and gaps. By taking these steps, you can significantly reduce noise in your basement and create a more peaceful space.
If you’re unsure about tackling this project on your own, don’t hesitate to reach out to basement renovation professionals in Toronto. Experts can ensure the job is done right the first time.
Contact us today to learn more about our soundproofing and basement renovation services. Thanks for reading!